Step-by-Step Skylight Installation Guide from Natural Home Solutions
Discover how to bring natural light into your home with our step-by-step skylight installation guide. From choosing the right location to finalizing the finishing touches, this comprehensive guide from Natural Home Solutions will help you brighten up your space and enhance your home’s ambiance.
Introduction to Skylights
Skylights are windows installed in a roof or ceiling, allowing natural light to enter a space from above. These architectural elements have been used for centuries to brighten up interiors and create a sense of openness and connection to the sky. Skylights come in a variety of shapes and sizes, from small, circular designs to large, rectangular ones, and can be fixed or operable to provide ventilation as well. They can be customized with different glazing options, such as clear glass, tinted glass, or even frosted glass for privacy. Skylights are not only functional but also add aesthetic value to a building, enhancing the overall design and ambiance of a room. They can transform dark and dull spaces into vibrant and inviting areas, improving the well-being of occupants by bringing in natural light and connecting them to the outdoors.
One of the key benefits of skylights is their ability to reduce the reliance on artificial lighting, thereby saving energy and reducing electricity costs. By harnessing natural sunlight, skylights can help to lower the carbon footprint of a building and contribute to a more sustainable environment. Additionally, skylights can improve the quality of indoor air by allowing for better ventilation and circulation of fresh air. This can lead to a healthier and more comfortable indoor environment for occupants. Skylights also offer the opportunity to enjoy the beauty of the changing sky, from watching clouds drift by to stargazing at night. Overall, skylights are a versatile and practical architectural feature that can enhance the functionality and aesthetics of any space.
Natural Home Solutions specializes in enhancing homes with expertly installed skylights, boosting natural lighting and ventilation. With decades of experience and a commitment to quality, they ensure energy-efficient, healthier living spaces backed by a no-leak guarantee, transforming interiors across Sydney.
Benefits of Installing Skylights
Installing skylights in a home or building can offer a wide range of benefits. Firstly, skylights bring in natural light, which helps to reduce the need for artificial lighting during the day. This not only saves on energy costs but also creates a more pleasant and inviting atmosphere in the space. Natural light has been shown to improve mood, productivity, and overall well-being. Additionally, skylights can help to make a room feel larger and more open by providing views of the sky and allowing more light to penetrate into the space. This can be particularly beneficial in smaller rooms or areas with limited access to windows.
Another major benefit of installing skylights is the potential for increased energy efficiency. Skylights can help to regulate the temperature in a space by bringing in natural light and heat during the winter months, reducing the need for heating, and providing ventilation to help cool the space in the summer. This can lead to lower energy bills and a reduced carbon footprint. Additionally, skylights can help to reduce the reliance on artificial heating and cooling systems, which can help to extend the lifespan of HVAC equipment and reduce maintenance costs in the long run. Overall, the installation of skylights can provide both environmental and financial benefits to homeowners and building occupants.
Choosing the Right Skylight for Your Home
Choosing the right skylight for your home involves considering several factors to ensure it complements your space and meets your needs. Firstly, determine the purpose of the skylight. Do you want to bring in more natural light, improve ventilation, or enhance the aesthetic appeal of your home? Different types of skylights cater to various functions, such as fixed skylights for consistent lighting, vented skylights for air circulation, and tubular skylights for smaller spaces. Next, consider the size and placement of the skylight. Larger skylights can brighten up a room significantly, but they may also impact the insulation and energy efficiency of your home. Additionally, the orientation of the skylight plays a crucial role in maximizing sunlight exposure and minimizing heat gain or loss depending on your climate.
Another essential factor to consider when choosing a skylight is the material and glazing options. High-quality skylights are typically made of tempered or laminated glass to ensure durability and safety. Additionally, selecting the right glazing can help improve energy efficiency and UV protection. Low-emissivity coatings, tinted glass, or double-pane options can assist in regulating temperatures and reducing glare. It’s also important to assess the slope and shape of the skylight to prevent water leakage and ensure proper drainage. Lastly, don’t forget to factor in installation and maintenance requirements when choosing a skylight. Consulting with a professional contractor can help you select the most suitable skylight for your home while ensuring proper installation and long-term performance.
Preparing Your Roof for Skylight Installation
Before beginning the process of installing a skylight on your roof, it is crucial to prepare the area properly to ensure a successful and seamless installation. The first step in preparing your roof for skylight installation is to carefully inspect the roof for any existing damage or issues that may need to be addressed. This includes checking for leaks, missing shingles, or any signs of water damage. It is essential to repair any issues before proceeding with the skylight installation to prevent any future problems. Additionally, you will need to clear the area around where the skylight will be installed, ensuring that there are no obstructions such as branches, debris, or other obstacles that could interfere with the installation process.
Once the roof has been inspected and any necessary repairs have been made, the next step in preparing for skylight installation is to choose the right location for the skylight. Consider factors such as the direction of sunlight, the slope of the roof, and the layout of the room below to determine the optimal placement for the skylight. It is important to ensure that the skylight is properly aligned and positioned to maximize natural light and ventilation. Additionally, you will need to measure and mark the exact location where the skylight will be installed on the roof, taking into account any structural supports or obstacles that may need to be worked around during the installation process. By carefully preparing your roof for skylight installation, you can help ensure a smooth and successful project that will enhance the aesthetics and functionality of your home.
Skylight installation should be entrusted to professionals like Natural Home Solutions, who bring over 50 years of combined experience to the table. With their expertise, your home will benefit from optimal light, improved ventilation, and guaranteed leak-proof results, enhancing both aesthetics and comfort.
Gathering the Necessary Tools and Materials
Gathering the necessary tools and materials is a crucial step in any project or task. Whether you are embarking on a DIY home improvement project, starting a new hobby, or preparing for a work assignment, having the right tools and materials at hand is essential for success. The first step in this process is to carefully assess the requirements of the project or task at hand. This involves creating a detailed list of all the tools and materials needed, taking into account quantities, sizes, and specifications. Once you have a clear understanding of what is required, you can begin the process of gathering everything you need. This may involve checking your existing inventory to see what you already have on hand, making a trip to the hardware store or craft store to purchase any missing items, or borrowing tools from friends or family if necessary.
Organizing and preparing your tools and materials before starting a project can save you time and frustration in the long run. It is important to set up a designated workspace where you can lay out all your tools and materials in an organized manner. This will make it easier to access what you need when you need it, reducing the likelihood of delays or mistakes during the project. Additionally, taking the time to properly store and care for your tools and materials can help extend their lifespan and ensure they are in good working condition when you need them again in the future. By gathering the necessary tools and materials and setting up a well-organized workspace, you can set yourself up for a successful and efficient project execution.
Step 1: Marking and Cutting the Opening
Step 1: Marking and Cutting the Opening involves the crucial initial step of measuring and marking the precise dimensions for the opening that needs to be cut. This step requires careful attention to detail and accuracy to ensure that the opening is the correct size for the intended purpose. The first task involves using a measuring tape or ruler to determine the exact dimensions of the opening needed. Once the measurements are determined, the next step is to mark the outline of the opening on the surface using a pencil or chalk. It is important to double-check the measurements and markings before proceeding to the cutting phase to avoid any errors that could result in an ill-fitting opening.
After marking the outline of the opening, the next step involves cutting along the marked lines to create the desired opening. Depending on the material being cut, different tools may be used, such as a saw, utility knife, or rotary tool. It is essential to follow safety precautions while cutting, such as wearing protective gear and ensuring the work area is clear of any obstructions. Careful precision and attention to detail are crucial during this step to ensure a clean and accurate cut that matches the marked dimensions. Once the opening is cut, it is important to check the dimensions again to confirm that it meets the required specifications before proceeding to the next step in the process.
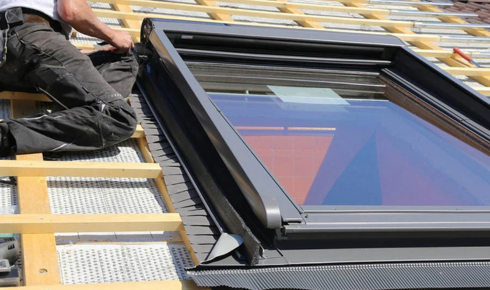
Step 2: Installing the Skylight Frame
Step 2 of installing the skylight frame involves preparing the opening in the roof for the frame. This step is crucial as it ensures that the skylight fits securely and properly in place. The first task is to measure the opening accurately to match the dimensions of the skylight frame. Next, you will need to make any necessary adjustments to the roof structure to accommodate the skylight, such as reinforcing the framing or cutting away any excess roofing material. Once the opening is prepared, carefully position the skylight frame into place, ensuring that it is level and securely fastened to the roof structure. Proper installation at this stage is essential to prevent any leaks or damage in the future.
After the skylight frame is securely in place, the next step is to weatherproof the installation. This involves sealing around the edges of the frame with a high-quality roofing sealant to prevent water infiltration. Additionally, flashing should be installed around the perimeter of the skylight frame to provide extra protection against leaks. It is important to follow the manufacturer’s instructions carefully and use the recommended materials to ensure a watertight seal. Once the weatherproofing is complete, the skylight frame is ready for the next stage of installation, which usually involves installing the glazing or glass panels. Properly completing this step ensures that your skylight will be a durable and functional addition to your home.
Step 3: Sealing and Insulating Around the Skylight
Step 3 involves sealing and insulating around the skylight to ensure proper energy efficiency and prevent any potential leaks. To begin, it is important to inspect the area around the skylight for any gaps or cracks that may allow air or moisture to seep through. Using a high-quality silicone sealant, carefully apply a bead of sealant along the edges of the skylight where it meets the roof, ensuring a tight seal to prevent any water infiltration. Additionally, consider using foam insulation strips to fill in any gaps between the skylight frame and the roof, providing an extra layer of protection against drafts and heat loss.
Next, focus on insulating the area around the skylight to improve the overall energy efficiency of your home. Choose an insulation material that is suitable for the type of skylight you have and carefully install it around the frame to create a thermal barrier. This insulation will help regulate the temperature around the skylight, reducing heat loss in the winter and heat gain in the summer. By properly sealing and insulating around the skylight, you can enhance the comfort of your living space, reduce energy costs, and prolong the lifespan of your skylight by preventing potential water damage.
Step 4: Finishing Touches and Interior Trim
In Step 4 of the home renovation process, the focus shifts to finishing touches and interior trim work. This stage involves adding those final details that truly bring a space together and elevate the overall aesthetic of the renovation project. Finishing touches can include installing crown molding, baseboards, door casings, and other decorative trim elements that add character and charm to the room. These elements not only provide a polished look but also help conceal any gaps or imperfections in the construction. Additionally, this step often involves painting or staining the trim to complement the rest of the room’s design scheme, ensuring a cohesive and harmonious finish.
Interior trim work plays a crucial role in defining the style and character of a space. Carefully selected trim profiles can enhance the architectural features of a room, create visual interest, and establish a sense of cohesion throughout the home. Whether opting for traditional, modern, or eclectic trim styles, attention to detail is key in achieving a professional and polished result. Trim work also serves a functional purpose by providing a transition between different surfaces, such as where walls meet ceilings or floors, and framing doors and windows. By focusing on finishing touches and interior trim, homeowners can add a layer of sophistication and refinement to their renovation project, elevating the overall look and feel of their living spaces.
Maintenance Tips for Skylights
Maintenance tips for skylights are essential to ensure they continue to function efficiently and enhance the overall aesthetic appeal of your home. Regular cleaning is crucial to prevent dirt, debris, and grime from building up on the skylight surface, which can obstruct natural light from entering your space. Use a mild detergent or specialized skylight cleaner along with a soft cloth or sponge to gently clean both the interior and exterior of the skylight. It is also important to inspect the seals and flashing around the skylight for any signs of wear or damage, as these components play a crucial role in preventing leaks and maintaining the skylight’s integrity. Addressing any issues promptly can help prevent more significant problems down the line.
In addition to regular cleaning and inspection, it is important to trim any overhanging branches or foliage near the skylight to prevent debris from falling onto the surface and potentially causing damage. Consider installing a skylight shade or covering to protect the skylight from excessive sunlight exposure, which can lead to fading or deteriorating seals over time. During extreme weather conditions, such as heavy rain or snow, it is recommended to check for any signs of leakage around the skylight and address them promptly to prevent water damage to your home. By following these maintenance tips for skylights, you can ensure they remain in optimal condition and continue to brighten your living space for years to come.